
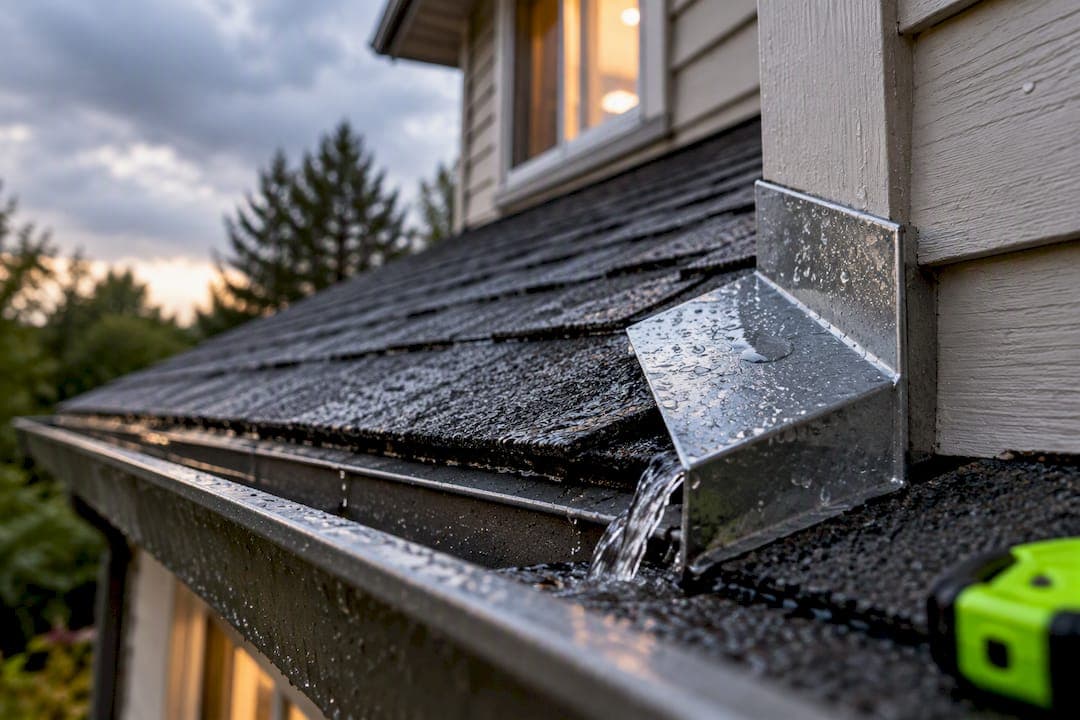
Kickout flashing, also called diverter flashing, sends roof runoff away from the wall and into the gutter instead of letting it soak the siding. That single redirect stops water from working behind the cladding, where it rots sheathing and framing out of sight. The Building America Solution Center recommends it at every roof-wall intersection, but it only works when it's sized right and tied into the step flashing and water-resistive barrier correctly.
TL;DR:
- Proper installation ensures kickout flashing projects past the siding edge and smoothly directs water into the gutter, preventing behind-siding moisture buildup.
- Prefabricated kickout pieces with seamless joins last longer and are preferred over field-bent options that often have soldered or caulked seams prone to failure.
- Incorrect or undersized flashings cause water to leak behind siding, leading to hidden rot, mold, and structural deterioration over time.
- Retrofitting new kickout flashing during roof or siding replacements is easier and less costly than attempting to add it afterward, which often requires siding removal.
- Visual signs like staining, bubbling, or soft spots below roof-wall intersections indicate existing leaks and warrant professional inspection and repair.
Table of Contents
- What kickout flashing is and where it's used
- How kickout flashing works with step flashing and the wall drainage plane
- Why missing or poorly installed kickout flashing causes damage
- When to install or repair kickout flashing
- Homeowner checklist: how to spot a correct or failing kickout flashing
- Practitioner perspective: installation lessons and common fixes
- Balancing risk and cost at this one detail
- How AM Exteriors can help with inspection and repair
- Sources
- FAQ
What kickout flashing is and where it's used
Kickout flashing comes in two forms: prefabricated pieces, molded or welded from metal or plastic, and site-formed pieces bent by hand from sheet metal. Prefabricated units have no seams to fail, so they hold up better over time than a hand-bent piece with a soldered or caulked corner.
You'll find kickout flashing anywhere a sloped roof meets a wall that continues down past the roofline. Common spots include dormer sidewalls, garage eaves that butt against the house, porch roofs tucked under a second story, and gutters that end right at a chimney. Each of these creates a point where water running down the roof would otherwise hit the wall directly instead of dropping into open air or a gutter.
Building codes and industry guidance call for flashing at these intersections for a reason. Water finds the easiest path down, and without a diverter, that path runs straight into the wall assembly.

How kickout flashing works with step flashing and the wall drainage plane
Step flashing and kickout flashing work as a team. Step flashing consists of small L-shaped metal pieces tucked under each shingle course and behind the siding, forming a shingled, overlapping path that carries water down the roof-wall joint one course at a time.
The kickout sits at the bottom of that run. It catches the water step flashing has been carrying and turns it outward, away from the wall, into the gutter below. Without it, water reaching the bottom of the step flashing run has nowhere to go but behind the siding.
Correct assembly depends on layering, not just placement:
- Step flashing laps over the water-resistive barrier the same way shingles lap over each other, shedding water outward at every course.
- The WRB tucks behind the top of the flashing and over the bottom, so water never meets a reverse lap that channels it back toward the wall.
- The kickout's projection and angle need to clear the siding and land inside the gutter, not just point in that general direction.
Get any one of those laps backward and you've built a funnel instead of a diverter.
Why missing or poorly installed kickout flashing causes damage
When a kickout is missing or undersized, water concentrates at that one spot on the wall every time it rains. It runs behind the siding, soaks the sheathing, and works its way into wall insulation and framing. Left unchecked, that moisture leads to rot, insulation that no longer performs, and mold growth inside a wall cavity nobody's looking at.

The tricky part is that this damage often stays hidden for years. Older wood siding tends to show staining or paint failure fairly quickly, but modern claddings like fiber cement and vinyl can mask the same water intrusion, so a wall can look fine while the sheathing behind it is failing according to InterNACHI.
A few installation mistakes show up again and again:
- A diverter sized too small to handle the water volume coming off that section of roof.
- Step flashing pieces that aren't lapped correctly with the shingles or the WRB.
- Seams sealed with caulk instead of built with a proper overlap, which fails long before the roof does.
Any one of these turns a flashing detail meant to protect the wall into the reason it's failing.
When to install or repair kickout flashing
The best time to get a kickout detail right is during a full roof or siding replacement, when the flashing, WRB, and cladding are all exposed at once. New construction has the same advantage: everything goes in in the right order before the wall is closed up.
Retrofitting an existing wall is harder. Doing it correctly usually means pulling back siding and trim so the new flashing can tie into the WRB the way it's supposed to, according to Building America. Sliding a piece under the siding without that integration, or sealing a gap with caulk, treats a symptom instead of the problem. This detail typically falls to whichever trade is already handling the roof or siding work, since it requires coordinating both.
Homeowner checklist: how to spot a correct or failing kickout flashing
A quick visual check from the ground can tell you a lot. Look for these signs:
- The flashing should project out past the edge of the siding, not stop flush with it.
- Water leaving the diverter should have a clear path into the gutter below, with nothing blocking the drop.
- The flashing should show a continuous lap with the step flashing above it, with no visible gap or exposed seam.
- A piece that looks small relative to the roof section it's draining, or one that's bent at an odd angle, is a common sign of an undersized, site-formed fix.
- Any staining, bubbling siding, or soft spots on the wall below the intersection are signs the assembly may already be leaking.
Pro Tip: If you can't tell whether the flashing is prefabricated or field-bent from the ground, that's a good reason to have someone check it up close rather than guess.
When you spot damage or you're not sure what you're looking at, that's the point to bring in a professional rather than patch it yourself.
Practitioner perspective: installation lessons and common fixes
On roof and siding replacement projects, getting the kickout right means coordinating the roofing, gutter, and siding crews so the flashing, WRB, and cladding go on in the correct order rather than getting patched around each other. Some contractors favor prefabricated diverters or welded-seam metal pieces over field-bent flashing, since a seamless piece removes one of the most common failure points at that joint.
A proper inspection looks at the flashing itself, the lap with the step flashing, and whether the WRB is integrated correctly, not just whether the wall looks dry from the yard. Homeowners should expect a clear explanation of what's found and a written estimate before any repair work starts.
Balancing risk and cost at this one detail
Kickout flashing is a small piece of metal or plastic, but it protects a spot where water damage can run for years before anyone notices. It's worth fixing whenever a roof or siding project already has that wall opened up, since retrofitting it later costs more in labor than material. If you're seeing staining, soft siding, or you just don't know what's behind that wall, that uncertainty is worth a professional look rather than a guess.
— Heather
How AM Exteriors can help with inspection and repair
If you're not sure whether your home has correct kickout flashing, or you've spotted signs of water damage at a roof-wall intersection, AM Exteriors can take a look during a roofing or siding inspection.

A proper inspection covers a visual check of the flashing and step flashing lap, an assessment of whether hidden moisture has reached the sheathing or framing, and gutter and soffit condition where they tie into the same detail. Retrofitting a kickout correctly often means removing a section of siding and trim, so we coordinate that work with any roofing or siding project already planned rather than treating it as a separate job. You'll get a clear estimate before anything starts. Roofing projects run $7,500 to $18,000 depending on scope, and siding work is quoted separately based on material and square footage. If you've noticed a soft spot on a wall below a roofline or you're planning a reroof, request an inspection and we'll walk you through what we find.
Sources
For technical diagrams and installation detail beyond what's covered here, the Building America Solution Center and Building Science Education resources cover sizing, integration, and code context in more depth.
- Step and Kick-Out Flashing at Roof-Wall Intersections | Building America Solution Center
- Kickout Flashing | InterNACHI
FAQ
Is kickout flashing necessary?
Yes. At any point where a sloped roof meets a wall that continues below the roofline, a kickout is the detail that keeps runoff from soaking the siding and sheathing, according to Building America. Skipping it concentrates water at that wall every time it rains.
Where should kickout flashing be installed?
It belongs at the bottom of any step flashing run where a roof edge meets a wall, including dormer sidewalls, garage eaves, porch roofs, and chimney-adjacent gutter runs. The kickout sits right where the step flashing ends and directs that water into the gutter.
How much does it cost to install kickout flashing on a roof?
Kickout flashing itself isn't priced separately since it's typically installed as part of a larger roofing or siding project. AM Exteriors roof replacements run $7,500 to $18,000, and the flashing detail is included in that scope.
Can I install kickout flashing on an existing roof?
Yes, but a proper retrofit usually means removing a section of siding and trim so the new flashing integrates with the water-resistive barrier correctly. Sliding a piece under existing siding or sealing gaps with caulk is a common shortcut that tends to fail faster than a fix done during a siding or roofing project.