
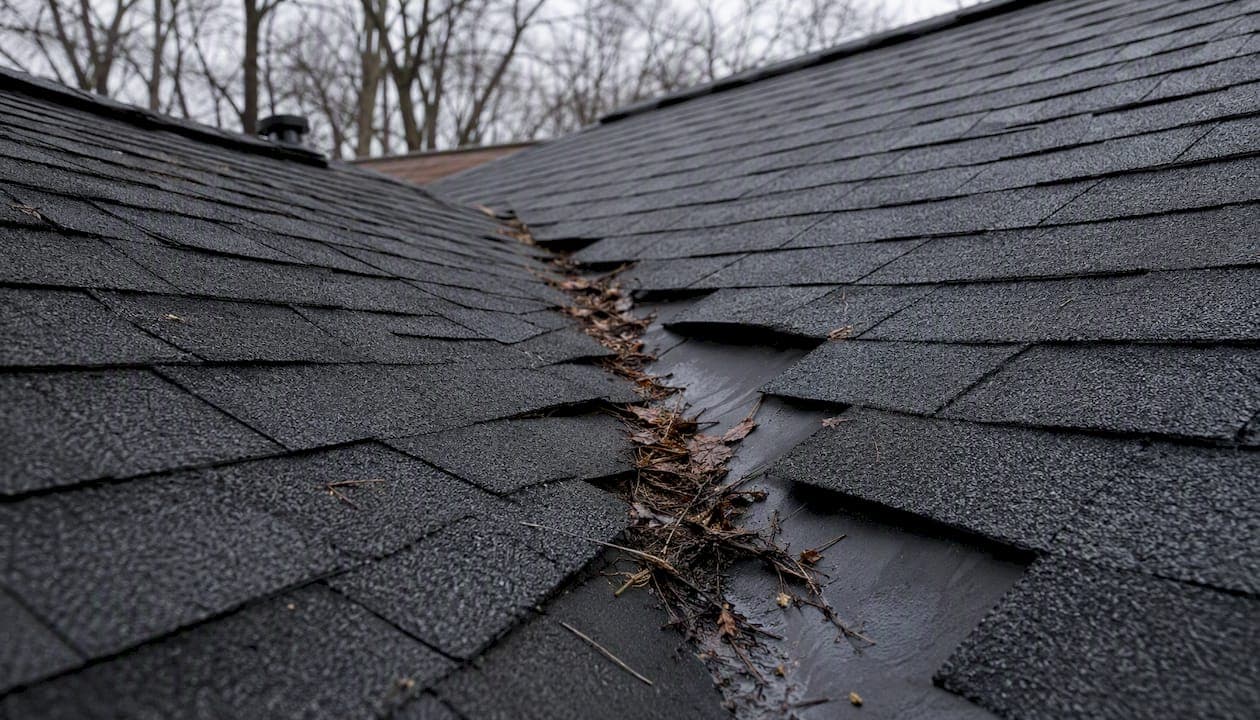
A roof valley leak is water entering where two roof planes meet. Stop the interior damage first, then confirm the valley as the entry point before choosing a temporary patch or a permanent repair.
Quick verdict:
- Most valley leaks trace to failed underlayment, aging flashing, or improper shingle installation at the valley edges.
- A small, accessible hole in an open (metal) valley can be patched temporarily. Closed and woven valleys almost always need a full reflash.
- Do not climb the roof in rain, ice, or wind. Wet shingles are slippery and the fall risk is real.
- Call a pro now if water is actively entering a finished living space, if you see soft decking or rot, or if the same valley has leaked more than once.
Pro Tip: Place a bucket under the drip and lay down plastic sheeting to protect flooring and drywall while you plan the repair. Interior damage compounds fast once insulation gets saturated.
Key Takeaways
A roof valley leak requires confirmed diagnosis, a temporary stop to interior damage, and a permanent repair that includes membrane and metal flashing, not sealant alone.
| Point | Details |
|---|---|
| Confirm before you repair | Use an attic inspection and a partner hose test to pinpoint the entry zone before removing any shingles. |
| Temporary fixes have a shelf life | Tarps, roof cement, and metal patches typically last 6–18 months; plan the permanent repair in the same season. |
| Permanent repair requires 36-inch removal | Remove shingles 36 inches each side, inspect the deck, install self-adhering membrane with 6-inch overlaps, then install metal valley flashing. |
| Sealant-only quotes are a red flag | Any repair scope that omits membrane and flashing replacement is not a permanent fix; ask for both in writing before signing. |
| Am-exteriors for SE Wisconsin | Am-exteriors provides documented valley repairs with attic inspection, deck photos, membrane and flashing installation, and written warranty terms. |
Table of Contents
- Why does a roof valley leak in the first place?
- How do you confirm the valley is the leak source?
- What are the most common causes of a leaking roof valley?
- Short-term fixes to stop an active leak right now
- Step-by-step permanent repair for closed and woven valleys
- What does a valley repair actually cost, and how long does it take?
- When should you hire a roofing professional?
- Routine maintenance that prevents valley leaks
- Common DIY mistakes that cause valley leaks to come back
- How Am-exteriors diagnoses and fixes valley leaks in SE Wisconsin
- What most homeowners overlook about valley repairs
- Get a warranty-backed valley repair from Am-exteriors
- Sources
Why does a roof valley leak in the first place?
A valley is the drainage highway of your roof. Every time it rains, water from two adjoining roof planes converges at the valley and accelerates downhill. That concentration of flow, combined with debris accumulation and freeze-thaw cycles, puts more stress on a valley than almost any other part of the roof.
There are three common valley construction types, and each handles that stress differently.
Open (metal) valley leaves a strip of metal flashing exposed down the center. Water sheds cleanly off the metal, and the entry point of a failure is usually visible. This is the most durable and easiest-to-repair configuration.
Closed-cut valley runs shingles from one roof plane across the valley and then cuts them back in a straight line. The cut edge sits directly over the underlayment, so any gap in the membrane or a nail too close to the centerline creates a direct path for water.
Woven valley interleaves shingles from both planes across the valley. Water must travel under two shingle layers before it hits the underlayment, which sounds protective but actually traps debris and moisture. Closed and woven valleys are especially prone to leaks; a proper repair often requires removing shingles, installing ice-and-water shield, and re-shingling with correct flashing.
Underneath any valley type, a self-adhering ice-and-water shield membrane is the last line of defense. When that membrane is missing, undersized, or punctured by misplaced nails, water finds the deck. Metal flashing in open valleys adds a second barrier, but flashing alone cannot compensate for a failed membrane.
The failure modes that catch homeowners off guard are rarely the obvious ones. Nails driven within 6 inches of the valley centerline create capillary paths that wick water sideways under shingles. Shingle corners left square instead of clipped at 45° funnel water directly into the valley seam. And old tar or caulk repairs that look intact on the surface often trap moisture underneath, accelerating deck rot that stays hidden until a full removal.
Pro Tip: If your roof has a chimney sitting uphill from a valley, check whether it has a cricket (a small peaked diverter behind the chimney). IRC 2024 requires a cricket on chimneys wider than 30 inches on the uphill side. A missing cricket sends a concentrated sheet of water directly into the valley below it.
How do you confirm the valley is the leak source?
Valley leaks commonly arise from aging flashing, improper installation, debris, and ice dams; accurate detection depends on combining an attic inspection with a roof hose test. Skipping either step means you may repair the wrong spot.
Here is the full diagnostic sequence:
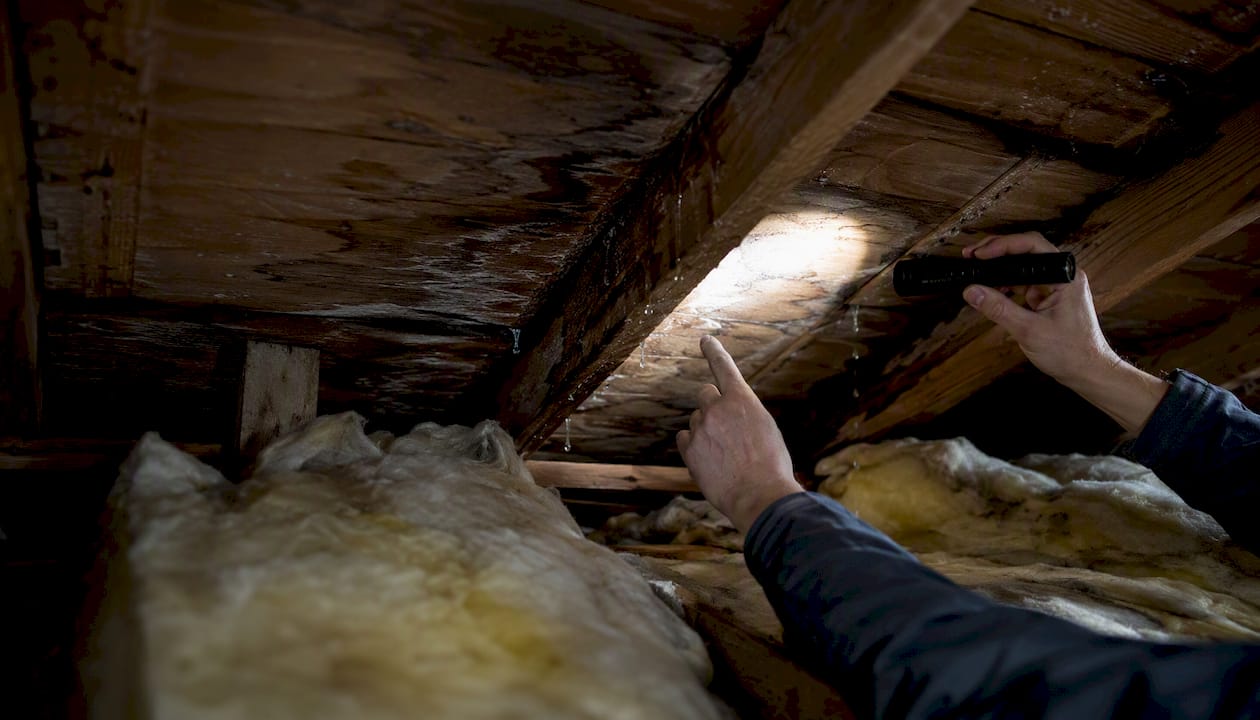
- Start in the attic during or right after rain. Bring a flashlight and look for active drips, wet streaks running along rafters, or water stains on the sheathing. Water travels along rafters before it drips, so the wet spot on the ceiling below is rarely directly under the entry point. Mark the highest wet streak with chalk or masking tape.
- Measure up from the attic floor to your chalk mark. That elevation helps you locate the entry zone on the roof surface.
- Set up the hose test on a dry day with a partner. One person stays in the attic with a flashlight and phone. The other person starts at the lowest point of the valley and runs a garden hose slowly over a 2-foot section for 60–90 seconds.
- Work uphill in sections. Move the hose up 2 feet at a time, waiting 90 seconds per section. When the person in the attic sees water appear, the entry point is in the section you just soaked. Mark that section on the roof with masking tape.
- Do a close exterior check from a ladder. Look for lifted or buckled flashing, cracked or missing shingles at the valley edges, exposed nail heads near the centerline, and debris or organic buildup sitting in the valley channel.
Safety checklist before you go up:
- Use a ladder rated for your weight plus tools (Type I or IA).
- Wear rubber-soled shoes and keep three points of contact on the ladder at all times.
- Never step onto a wet, icy, or frost-covered roof.
- Wear a safety harness if the roof pitch is 6:12 or steeper.
- Have a second person present whenever you are on the roof.
Materials needed for the hose test: garden hose with adjustable nozzle, flashlight, chalk or masking tape, phone for communication between partners.
Attic inspection during rain and a coordinated hose test are the most dependable homeowner diagnostics to pinpoint where water is entering a valley.
What are the most common causes of a leaking roof valley?
Matching the symptom to the cause saves you from repairing the wrong thing. Here are the five failure modes that show up most often.
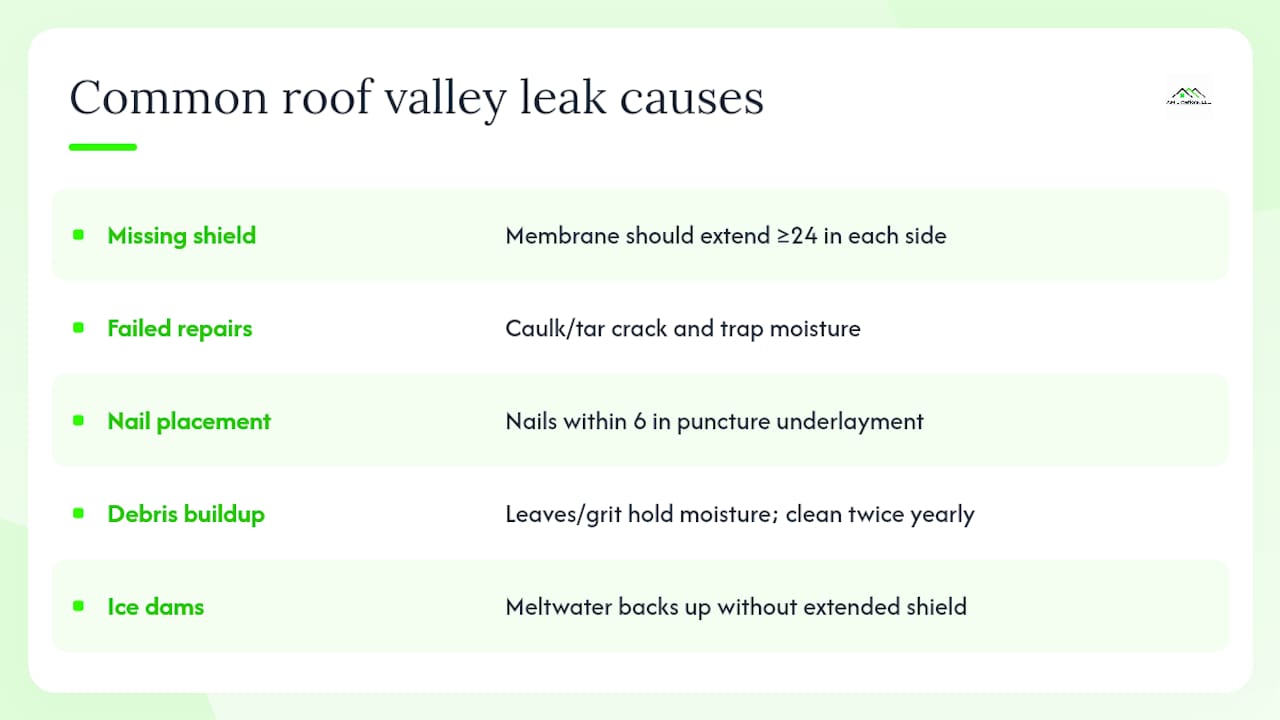
Missing or undersized ice-and-water shield. The membrane should extend at least 24 inches on each side of the valley centerline, and in cold climates like Wisconsin, wider coverage is better. When it is absent or stops short, any breach in the shingles above it sends water straight to the deck.
Aged or cracked shingles at the valley edges. Shingles near valleys take more UV exposure and more water volume than field shingles. Granule loss, curling, and cracking appear here first. Once a shingle edge lifts, water runs under it and channels into the valley seam.
Nail placement too close to the centerline. Nails driven within 6 inches of the valley center puncture the underlayment in the highest-stress zone. Each nail hole is a potential entry point, and capillary action pulls water sideways along the nail shank.
Debris buildup is the cause homeowners underestimate most. Leaves, pine needles, and granule sediment collect in the valley channel and hold moisture against the shingles for days after rain stops. That sustained contact softens shingle edges, degrades sealant strips, and eventually works water under the laps. Cleaning a valley twice a year costs nothing and prevents failures that cost thousands.
Ice dams. In Wisconsin winters, ice dams form when heat escaping through the roof melts snow, which refreezes at the cold eaves. Valleys are natural collection points for that meltwater. Without adequate ice-and-water shield extending past the interior wall line, that water backs up under the shingles and into the structure.
Failed previous repairs. Caulk and tar patches look intact from the ground. Underneath, UV exposure and freeze-thaw cycling crack them within a few seasons, and the patch itself can trap moisture against the deck. Sealant-only or tar-based repairs are generally short-lived and often cause more damage by trapping moisture under shingles.
Pro Tip: When you find a tar or caulk patch during inspection, treat it as evidence of a previous leak, not a previous repair. Probe the deck around it for softness before deciding on repair scope.
Short-term fixes to stop an active leak right now
Temporary repairs buy time. They do not solve the underlying problem, and temporary repairs typically last 6–18 months before UV exposure and thermal cycling degrade them. Use them to limit interior damage while you plan a permanent repair.
- Emergency tarp method. Lay a heavy polyethylene tarp (6 mil or heavier) over the valley and extend it past the ridge and past the eaves. Secure the edges with 2x4 wood battens screwed into the roof deck, not into the shingles themselves. Never nail through the tarp into shingles without battens; the holes create new entry points. A properly secured tarp can hold through several rain events.
- Roof cement or rubberized sealant for small visible holes. Apply only on a clean, dry surface. Roof cement (also called plastic roof cement or flashing cement) fills small cracks and exposed nail heads in open valleys. It degrades under prolonged UV exposure and is not a substitute for flashing. Use a trowel to feather the edges so water does not pond against the patch.
- Sheet-metal patch for open valleys. Small holes in open metal valleys can be patched using the same metal type, roof cement, and careful edge sealing as a short-term repair. Cut the patch at least 2 inches larger than the hole on all sides, slide it under the shingle edges, and bed it in roof cement. Match the metal: aluminum over aluminum, galvanized over galvanized. Mixing metals causes galvanic corrosion that destroys both pieces within a few years.
After 6–18 months, temporary fixes typically fail and often increase the eventual repair scope because moisture continues working into the deck underneath. A patch that looks fine on the surface can be hiding rot that doubles the cost of the permanent repair.
Step-by-step permanent repair for closed and woven valleys
Best-practice permanent repairs expand the exposed zone to approximately 36 inches each side, install a heavy-duty self-adhering membrane, and use properly installed metal valley flashing to avoid repeat leaks. Here is how to do it.
Tools and materials
| Item | Specification | Notes |
|---|---|---|
| Ice-and-water shield membrane | Self-adhering, min. 36 in. wide roll | GAF StormGuard or equivalent; check shingle manufacturer compatibility |
| Metal valley flashing | W-style or V-style, 24 in. wide | Aluminum (0.019 in.), galvanized steel (26 gauge), or copper |
| Roofing nails | galvanized | Fasteners must match flashing metal to prevent corrosion |
| Roof deck screws | coarse thread | For securing any replaced plywood sections |
| Replacement plywood | OSB/CDX | Match existing deck thickness |
| Roofing cement / sealant | Polymer-modified or rubberized | Compatible with membrane and shingle type |
| Utility knife with hook blades | Standard | For cutting shingles cleanly |
| Pry bar and flat bar | Standard | For shingle removal without deck damage |
| Chalk line | Standard | For marking cut lines |
| Safety harness and anchor | OSHA-rated for roof work | Required at 6:12 pitch or steeper |
Repair sequence
Step 1: Remove shingles 36 inches each side of the valley centerline. Use a flat bar to lift shingle tabs and pull nails. Work from the top of the affected section downward. Remove carefully to avoid damaging shingles you plan to reuse.
Step 2: Inspect and repair the deck. Press the plywood with your hand and a screwdriver. Soft spots, delamination, or visible rot require replacement. Cut out damaged sections to the nearest rafter, install blocking between rafters if needed, and screw in replacement plywood flush with the surrounding deck.
Step 3: Install ice-and-water shield. Center the membrane roll on the valley centerline. Peel the backing and press firmly from the center outward to avoid air pockets. Overlap horizontal seams by at least 6 inches, with the upper piece lapping over the lower. In Wisconsin, extend the membrane at least 24 inches past the interior wall line to cover ice-dam risk zones. GAF StormGuard and similar products provide manufacturer installation guidance that affects warranty compliance.
Step 4: Install metal valley flashing. Start at the bottom and work upward, overlapping each piece by at least 6 inches. For W-style flashing, the center rib directs water away from the valley seam. Nail only along the outer edges, keeping fasteners at least 1 inch from the flashing edge and never in the valley channel itself. Winged flashing directs concentrated flows away from vulnerable corner pinholes and is a durable upgrade where corner flow is a known risk at the top of the valley where it meets a ridge or a chimney.
The single most common re-leak after a DIY repair is a nail driven through the flashing in the valley channel. Each nail hole in the metal is a direct water path to the deck below. Fasten only at the outer edges, and use a bead of compatible sealant under each fastener location.
Step 5: Reinstall shingles. Snap a chalk line 3 inches each side of the valley centerline as a no-nail zone. Clip the leading corner of each shingle at 45° before laying it. Keep all nails at least 6 inches from the centerline, and apply a dab of roofing sealant under each clipped corner. Do not nail through the valley flashing.
Step 6: Test the repair. Run a garden hose over the repaired section for at least 5 minutes while a partner checks the attic. No drips means the repair is sound.
Time estimate: A 10–20 foot valley with no deck damage takes one experienced DIYer roughly 4–6 hours. Add a half day if deck sections need replacement.
Pro Tip: When selecting metal flashing, copper outlasts aluminum and galvanized steel by decades but costs significantly more. For most Wisconsin homes, 26-gauge galvanized steel or 0.019-inch aluminum is the practical choice. If you use aluminum flashing, confirm your shingle manufacturer's sealant is aluminum-compatible before applying.
What does a valley repair actually cost, and how long does it take?
Setting a realistic budget before you start prevents mid-project surprises.
- Temporary patch (tarp or roof cement). DIY material cost: $20–$80. Time: 1–3 hours. This is an emergency measure, not a repair. Budget for the permanent fix within the same season.
- Small open-valley metal patch. DIY material cost: $30–$100 for metal, cement, and tools. Time: 2–4 hours. Appropriate only for a single small hole in an otherwise sound open valley.
- Partial reflash (one valley, no deck damage). DIY material cost: $150–$400 for membrane, flashing, and shingles. Contractor cost typically ranges from $500–$1,500 depending on valley length and local labor rates. Time: 1 day.
- Full reflash with deck repair or valley conversion. DIY material cost: $300–$700 or more depending on deck damage. Contractor cost typically ranges from $1,000–$3,500 for a single valley with moderate deck repair. Time: 1–2 days.
- Multiple failing valleys or full replacement. When more than two valleys are failing or the deck is compromised across a large area, a full roof replacement is often more cost-effective than repeated targeted repairs. Get a written scope comparison from your contractor.
Temporary fixes almost always increase total lifetime cost. A patch that delays a $1,200 reflash by one season while moisture continues degrading the deck can turn that repair into a $2,500 job. Deciding between repair and replacement depends on the age of the roof, the extent of deck damage, and whether multiple valleys are involved.
Procurement checklist before you buy materials:
- Confirm your shingle brand's installation guide for membrane compatibility (some manufacturers void warranties with non-approved underlayments).
- Check local building code for minimum ice-and-water shield coverage in your climate zone.
- Verify flashing metal matches any existing open-valley metal on the same roof.
- Ask a contractor for a written scope that itemizes membrane brand, flashing gauge, and warranty terms before signing.
When should you hire a roofing professional?
Some valley problems are beyond what a careful DIYer should attempt. Here are the clear triggers.
A sealant-only repair quote is a red flag, not a solution. Chimney flashing failures and valley repairs that rely solely on caulk or sealant are short-lived compared with properly bedded counterflashing or a full reflash. If a contractor's written scope says "seal and caulk" with no mention of membrane or flashing replacement, ask why before you sign.
Red flags that require professional help:
- Water is actively entering a finished living space (ceiling, walls, electrical).
- You find soft, spongy, or delaminated decking when you probe the valley area.
- More than one valley is leaking, or the same valley has leaked twice in two years.
- The valley runs adjacent to a chimney, skylight, or other penetration with complex flashing geometry.
- The chimney uphill from the valley is wider than 30 inches and lacks a cricket.
Questions to ask every contractor before signing:
- Will you do an attic inspection and show me photos of the deck condition?
- What membrane brand and thickness will you install, and is it compatible with my shingles?
- What flashing gauge and metal type will you use?
- What does the warranty cover, and for how long?
- Are you licensed and insured in Wisconsin?
- What is the timeline, and will you test the repair with a hose before you leave?
A quality contractor provides a written scope listing materials by brand and specification, photos of the deck before and after, and a warranty that covers both materials and workmanship. Am-exteriors's documented six-step process covers inspection through final testing and warranty documentation, which reduces friction if you later need to file an insurance claim for storm-related damage.
Pro Tip: Ask for the warranty in writing before work starts, not after. A verbal warranty is unenforceable. The written document should state what triggers a warranty claim, who to contact, and the response timeline.
Routine maintenance that prevents valley leaks
Most valley failures are preventable with twice-a-year attention.
- Clear the valley channel every spring and fall. Remove leaves, pine needles, and granule sediment by hand or with a soft brush. Never use a pressure washer on shingles; it strips granules and voids most manufacturer warranties.
- Inspect flashings and shingle edges after every major storm. Look for lifted flashing tabs, cracked shingle edges, and exposed nail heads. Catching a lifted flashing early costs almost nothing to fix.
- Check the attic after heavy rain or snowmelt. A flashlight sweep takes five minutes and catches new moisture intrusion before it becomes structural damage.
- Keep gutters and downspouts clear. A backed-up gutter at the valley's base creates ponding that pushes water back under the shingles. Gutter maintenance and valley health are directly connected.
- Trim overhanging branches. Branches deposit debris directly into valleys and can scrape shingles during wind events, wearing away granules faster than normal weathering.
- Address ice dams before they recur. Improve attic insulation and ventilation to reduce heat loss through the deck. In Wisconsin, ice-and-water shield should extend at least 24 inches past the interior wall line in valleys, and ideally further in north-facing or heavily shaded sections.
Recommended inspection cadence: Do your own visual check from the ground or attic twice a year. Schedule a professional preventive inspection every 3–5 years, or after any hail or wind event that causes visible damage elsewhere on the roof.
Pro Tip: The best time to inspect a valley is the day after a heavy rain, when water stains on the attic sheathing are still fresh and easy to trace. Waiting until the next storm means losing that diagnostic window.
Common DIY mistakes that cause valley leaks to come back
Knowing what not to do saves as much money as knowing the right repair steps.
Caulk is not a flashing material. Applying a bead of sealant over a valley seam from above is the most common DIY mistake in roof repair. It looks like a fix. Under UV exposure and freeze-thaw cycling, it cracks within a few seasons, and the gap it leaves is often wider than the original opening. Worse, it traps moisture underneath, which accelerates deck rot in the exact zone you were trying to protect.
Driving nails within 6–10 inches of the valley centerline is the second most common error. Every nail hole in the high-stress zone is a potential entry point. The standard is to keep all fasteners at least 6 inches from the centerline for closed-cut valleys and at least 1 inch from the edge of metal flashing in open valleys.
Using mismatched metal patches creates galvanic corrosion. Aluminum and galvanized steel in direct contact with moisture generate an electrochemical reaction that destroys both metals faster than normal weathering. Always match the patch metal to the existing flashing.
Face-nailing counterflashing into masonry (at chimneys) instead of setting it into a reglet cut is a common shortcut that fails within a few years. Masonry expands and contracts at a different rate than metal, and a face-nailed flashing will pull away from the wall.
Ignoring attic evidence leads to under-scoped repairs. A water stain on the attic sheathing 4 feet from the valley centerline means water has been traveling that far before dripping. Repairing only the visible entry point without checking the full moisture migration path leaves hidden rot in place.
Temporary repairs used past their service life are a version of the same mistake. A tarp or roof-cement patch that has been in place for more than 18 months is likely failing underneath even if it looks intact from the ground.
How Am-exteriors diagnoses and fixes valley leaks in SE Wisconsin
Am-exteriors brings over 25 years of owner-operated exterior experience to valley repairs across Southeast Wisconsin, where hail, ice dams, and heavy snow create the exact failure conditions described in this guide.
The repair process follows a documented sequence:
- Attic inspection first. Trace active drips and moisture stains to identify the entry elevation before touching the roof surface.
- Hose test to confirm the entry zone. A two-person hose test pinpoints the section before any shingles are removed.
- Full deck evaluation after shingle removal. Every soft or delaminated section is photographed and documented before replacement.
- Targeted removal to 36 inches each side. This exposes hidden rot and ensures the membrane covers the full failure zone.
- Membrane and flashing installation. Self-adhering ice-and-water shield is installed first, followed by properly fastened metal valley flashing. In Wisconsin, extended membrane coverage past the interior wall line is standard practice given the ice-dam risk.
- Re-shingle with correct nail placement and clipped corners. Final nail placement is verified before the repair is closed.
- Post-repair hose test. The valley is tested before the crew leaves the site.
- Written documentation. Deck photos, material specs, and warranty terms are provided in writing. For storm-related damage, Am-exteriors assists with insurance claim documentation to reduce friction during the claims process.
For homeowners dealing with storm damage that includes valley failures, the documented repair scope and photos are often the difference between a smooth insurance claim and a disputed one.
What most homeowners overlook about valley repairs
The detail that causes the most repeat service calls is not the flashing metal or the membrane brand. It is accepting a sealant-only repair as a finished job.
A contractor who seals over a valley from above without removing shingles, inspecting the deck, and installing a continuous membrane is not repairing the valley. They are delaying the next leak by a season or two while moisture continues working into the structure underneath. The repair looks complete. The invoice looks reasonable. And then the ceiling stains come back.
Insist on a written scope that specifies membrane installation and flashing replacement. If a quote does not include those two items, it is not a permanent repair. That one question, asked before you sign, is worth more than any amount of post-repair troubleshooting.
Get a warranty-backed valley repair from Am-exteriors
A leaking valley in Southeast Wisconsin does not get better on its own through winter. Am-exteriors provides emergency leak response for active leaks, followed by a documented permanent repair that includes attic inspection, deck evaluation, membrane installation, and metal valley flashing.

Service scope includes emergency tarping and patching, partial reflash, full valley conversion to open metal, deck replacement, and insurance claim documentation. Every repair comes with a written scope listing materials by brand and specification, pre- and post-repair photos, and warranty terms in writing.
For homeowners across SE Wisconsin, including Milwaukee, Waukesha, Hartford, and Dodge County, Am-exteriors offers roof repair services backed by over 25 years of owner-operated experience. Request an inspection estimate and have your address, roof age, and a description of where the leak appears inside the home ready for the call.
Sources
- Roofingcalc
- Roof Leak in Valley: Causes, Detection, and Repair for Homeowners – New England Metal Roof
- Roof Valley Repair: Ultimate Guide
- Chimney flashing leak repair
- Flashing takes flight — Fine Homebuilding
- How To Repair a Leaky Roof (open valley repair) — HowStuffWorks