
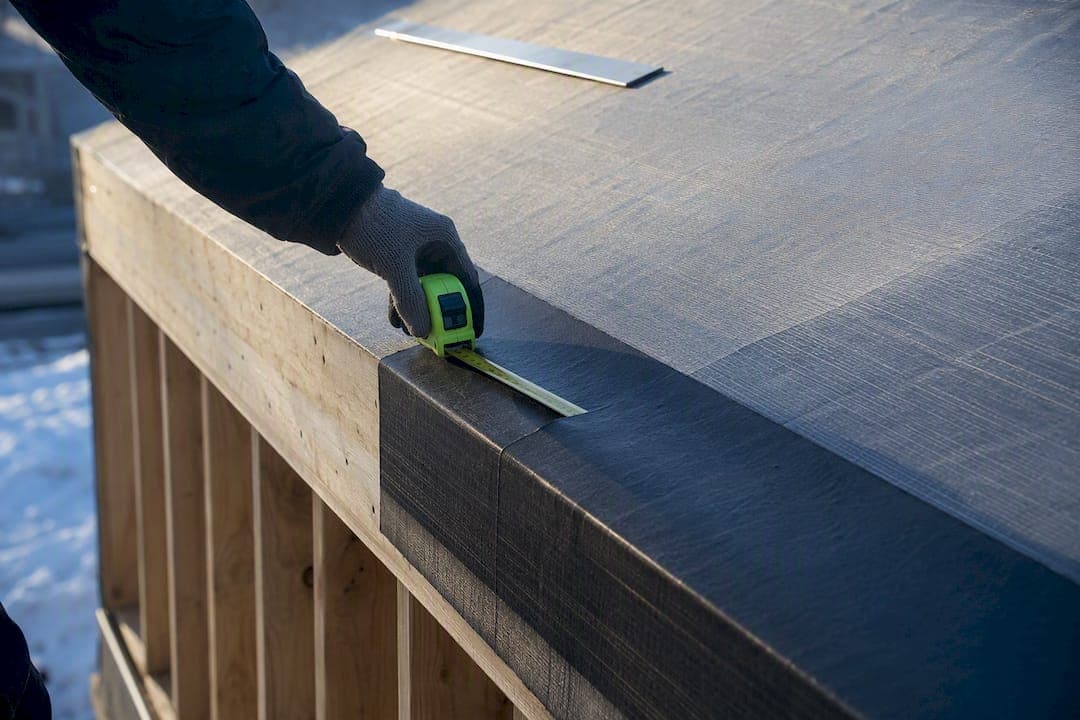
Yes, Wisconsin requires ice dam protection on most shingled and shake roofs over heated space, under SPS 321.28. The membrane must extend at least 30 inches up the roof slope from the edge and at least 12 inches past the interior wall face, and it has to meet the ASTM D1970 standard. The highest-risk spots stay the same everywhere in the state: eaves, valleys, and any roof penetration.
TL;DR:
- Most Wisconsin homes over heated spaces require ice dam protection that extends at least 30 inches up from the roof edge and 12 inches past the interior wall face, meeting ASTM D1970 standards.
- Coverage should be continuous at eaves, valleys, and around all roof penetrations such as chimneys and vents, with additional protection at low-slope transitions in high-risk areas.
- Proper installation involves layered membrane application in the correct sequence, with a focus on full coverage validation, and avoiding common errors like partial runs or improper flashing.
- The membrane's durability depends on adherence to ASTM D1970, with high-temperature rated products necessary for metal roofs; UV exposure should not exceed manufacturer limits of 30 to 120 days.
- Addressing attic heat loss through insulation and ventilation is essential to prevent ice dams, as membrane failures usually stem from poor installation or attic issues rather than product defects.
Table of Contents
- What Does Wisconsin's Ice and Water Shield Code Say?
- Where Should Ice and Water Shield Go on Your Roof?
- What Should an Ice and Water Membrane Actually Do?
- Installation Mistakes That Defeat a Good Membrane
- Why Insulation and Ventilation Matter as Much as the Membrane
- How Do You Know If Your Ice Barrier Is Failing?
- A Local Roofer's Take on Ice Dam Failures
- Get Code-Compliant Ice Dam Protection From a Wisconsin-Owned Roofer
- Sources
- FAQ
What Does Wisconsin's Ice and Water Shield Code Say?
Wisconsin Administrative Code SPS 321.28(4) sets the measurement in plain terms: protection extends at least 30 inches up the roof slope from the roof edge, and at least 12 inches beyond the inner face of the exterior wall. "Inner face of the exterior wall" means the inside surface of your wall framing, not the outside siding line. On a typical Wisconsin ranch with a 1 foot overhang, that 12 inch measurement usually pushes the total coverage well past what a lot of homeowners assume they're getting.
The rule applies to shingle and shake roofing over conditioned living space, which covers the overwhelming majority of Wisconsin homes. Flat garages, unheated sheds, and some low-slope commercial roofs fall outside the requirement, but any reroof on a heated house triggers it. Wisconsin sits mostly in Climate Zone 6, and that classification is exactly why the state built this requirement into the building code in the first place. Cold snaps followed by thaw cycles are routine here, and that freeze-thaw pattern is what drives ice dams.
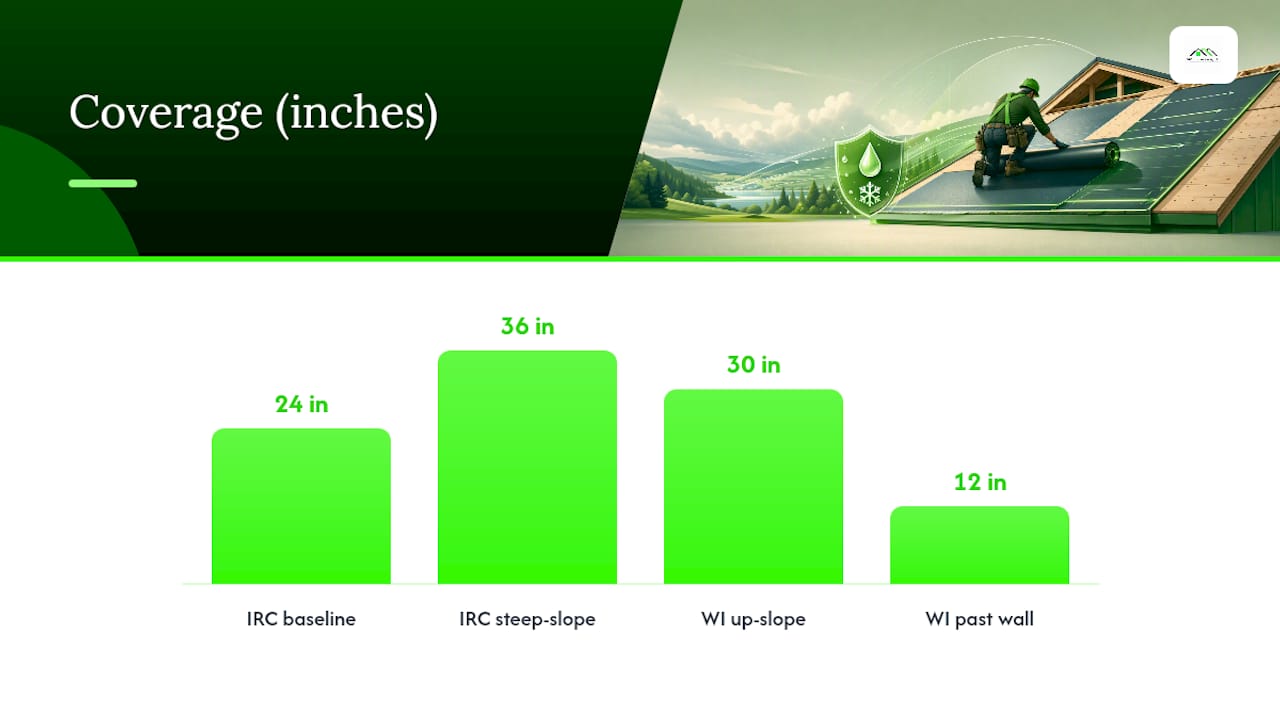
Compare that to the model International Residential Code, which many states outside Wisconsin still follow closer to its base language. The IRC baseline calls for 24 inches inside the exterior wall line in cold climates, with some steep-slope applications pushing to 36 inches along the slope. Wisconsin's adopted rule sits closer to the stricter end of that range:
- IRC baseline: 24 inches past the interior wall line
- IRC steep-slope variant: up to 36 inches along the roof slope
- Wisconsin SPS 321.28: 30 inches up-slope from the edge, plus 12 inches past the interior wall face
If your contractor quotes coverage based on a generic 24 inch rule of thumb, that scope may not satisfy Wisconsin's own code on your specific wall assembly.
Where Should Ice and Water Shield Go on Your Roof?
The code minimum is a floor, not a map of every vulnerable spot. Here's how coverage actually needs to run across a Wisconsin roof:
- Eaves first. Measure from the roof edge up the slope at least 30 inches, then separately verify that the membrane reaches at least 12 inches past your interior wall face. On homes with wide overhangs or shallow slopes, one course of standard-width membrane often doesn't cover both numbers, so a second course gets layered in with a proper overlap.
- Valleys, continuously. Valleys funnel more water than any other part of the roof, and the membrane there is a backup to metal or shingle-over valley flashing, not a substitute for it. Coverage should run the full valley length with no gaps.
- Every penetration. Chimneys, plumbing vents, and skylights each need membrane wrapped and sequenced before the surrounding flashing goes on, since penetrations concentrate water exactly where seams already exist.
- Low-slope transitions. Anywhere a steep section meets a shallow one, snowmelt slows down and refreezes. That transition line deserves the same treatment as an eave.
- Rakes, in wind-driven snow areas. Not always code-required, but worth discussing with your installer if your property sits exposed to open fields or lake-effect wind.
Homeowners with long eave overhangs, north-facing slopes, or a documented history of ice damming often extend coverage beyond the 30/12 minimum. It costs more material up front but far less than a ceiling repair after a January thaw.
What Should an Ice and Water Membrane Actually Do?
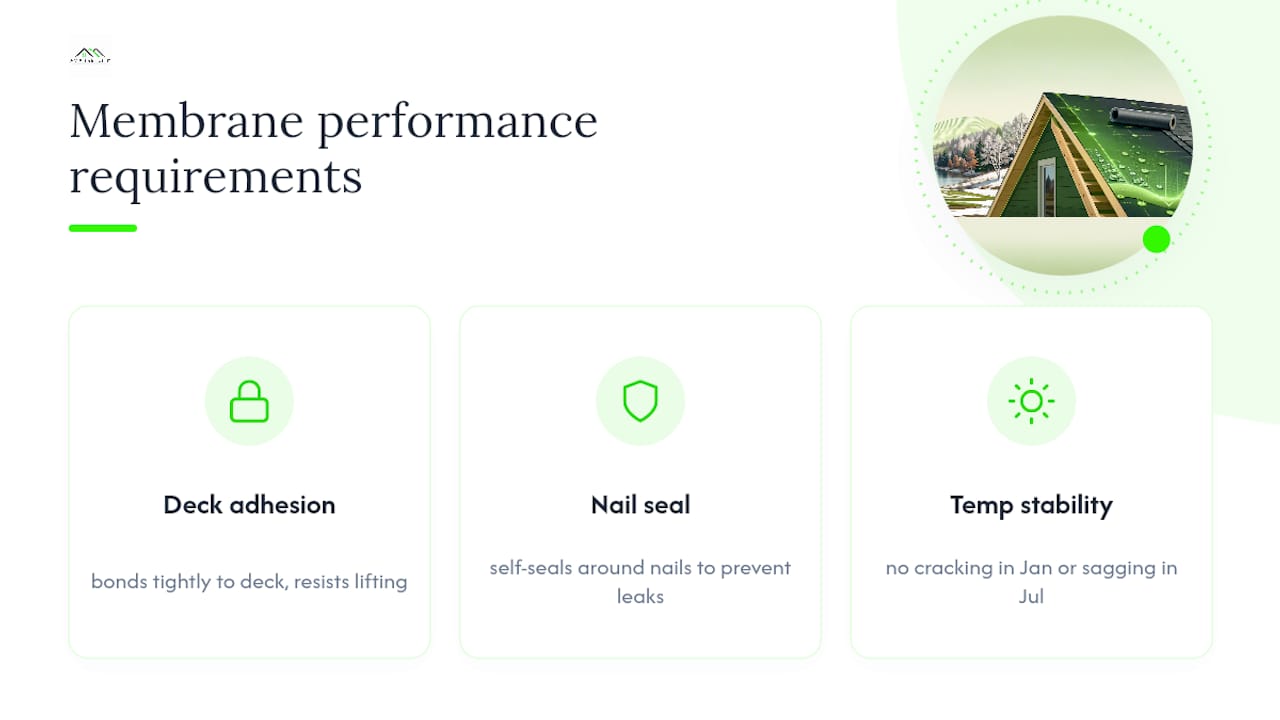
Every membrane installed to meet Wisconsin's requirement has to satisfy ASTM D1970, the standard that governs self-adhering polymer-modified bitumen sheet materials used as roof underlayment. In practical terms, that standard is checking three things: the membrane bonds tightly to the deck without lifting, it seals around roofing nails so a puncture doesn't become a leak path, and it holds its shape and adhesion across Wisconsin's real temperature swings instead of cracking in January or sagging in July.
Metal roofs need a different product entirely. Standing seam and metal shingle panels run hotter than asphalt shingles in direct sun, and a standard rubberized asphalt membrane can soften or bond permanently to the panel underside under that heat. High-temperature, or HT, rated membranes are built to resist that. If your project involves standing seam, ask specifically for the HT product line and confirm it in writing.
Statistic Callout: Manufacturer temporary exposure limits (how long membrane can sit uncovered before UV degrades it) range from roughly 30 to 120 days depending on the product, which is why a crew shouldn't leave a deck exposed indefinitely between tear-off and shingle installation.
Ask your installer for the product's technical data sheet before the job starts, not after.
Installation Mistakes That Defeat a Good Membrane
A code-compliant membrane installed wrong performs worse than no membrane at all, because it creates a false sense that the leak risk is handled. The correct sequence runs dry deck, drip edge at the eave, membrane over the drip edge, then the field underlayment and finish roofing layered on top in that order.
Watch for these installer errors:
- Partial-width runs that stop short of the full 30 inch up-slope or 12 inch interior-wall measurement, usually to save material cost.
- Drip edge installed after the membrane instead of before it at the eave, which sends water behind the metal instead of over it.
- Poor flashing integration at valleys and penetrations, where the membrane gets tucked under a step or counter-flashing incorrectly and traps water instead of shedding it.
- Skipped substrate prep, meaning dust, moisture, or old adhesive residue left on the deck before the self-adhering membrane goes down, which weakens the bond over time.
- Wrong lap direction, where upper courses don't overlap lower courses by enough to shed water downhill.
Pro Tip: Ask your contractor to photograph the deck and membrane before the finish roofing goes on, and request those photos with the measured coverage marked. It takes five minutes on their end and gives you a permanent record if a warranty question ever comes up.
A completed job should let you confirm, in writing, exactly how far the membrane runs at every eave and valley, along with the product name and ASTM D1970 compliance statement.
Why Insulation and Ventilation Matter as Much as the Membrane
Ice dams start in the attic, not on the roof. Heat escaping from living space warms the underside of the roof deck, melts the snow layer directly above it, and that meltwater runs down until it hits the colder overhang and refreezes into a dam. Ice and water shield stops that refrozen water from soaking into your deck, but it does nothing to stop the heat loss causing the melt in the first place.
That's why a membrane alone is sometimes a stopgap rather than a fix. If your attic has thin or compressed insulation, unsealed can-lights, or a bathroom fan venting into the attic instead of outside, you'll likely keep forming ice dams every winter regardless of how well the membrane was installed.
- Air-sealing attic penetrations reduces the warm air reaching the roof deck.
- Adding insulation to code-recommended depth slows heat transfer from below.
- Balanced soffit-to-ridge ventilation keeps the whole underside of the deck at a more even, colder temperature.
A roofing contractor and an insulation contractor solving the problem together, rather than separately, is usually what actually breaks the cycle. Our guide on stopping ice dams before they wreck your roof walks through the attic side of that equation in more depth.
How Do You Know If Your Ice Barrier Is Failing?
Recurring ceiling stains in the same spot every winter, visible water tracks on attic framing, or wet sheathing you can feel with a bare hand are all signs something in the system has failed. It's worth remembering that most interior leak stains show up away from the actual entry point, since water often travels along framing before it drips. That's exactly why a flashlight check into the attic during or right after a snowmelt beats guessing from inside the house.
A real inspection should check membrane coverage against the 30/12 measurement, flashing condition at every valley and penetration, and attic moisture or thermal signs of a heat-loss problem. Between inspections, clean gutters every fall, confirm attic vents aren't blocked by blown-in insulation, and watch for icicles forming in the same location year after year.
When you're vetting a contractor, ask for documented coverage measurements, confirmation they follow manufacturer-accepted installation practices, and the specific warranty terms in writing before signing anything.
A Local Roofer's Take on Ice Dam Failures
Twenty-five years of roofing in Southeast Wisconsin surfaces the same failure pattern over and over: it's rarely the membrane brand that fails, it's the installation. Crews in a hurry to finish before a snowstorm skip the second course at a wide eave, or they nail through the membrane in a spot that never gets sealed properly because the deck wasn't clean. Code compliance on paper and code compliance on the actual roof are two different things, and only one of them keeps water out of your ceiling.
Owner-supervised jobs catch this because someone with authority to stop the work is actually checking measurements against SPS 321.28 before the shingles go down, not after a homeowner calls about a stain. Manufacturer partnerships matter here too. When a crew installs the same product lines daily, they know the exposure windows and lap requirements without guessing, and that consistency shows up in fewer callbacks five winters later.
— Heather
Get Code-Compliant Ice Dam Protection From a Wisconsin-Owned Roofer
A trusted local roofing contractor can provide a documented membrane coverage plan, supervised installation, and manufacturer-grade materials with warranty support, giving you a written record rather than a verbal promise.

A free inspection starts with checking your existing eaves, valleys, and attic for the same red flags covered above, and if a storm caused the damage, the contractor may provide assistance with the insurance claim process. Whether you need a full roof replacement or want a second opinion on a recent installation, request a free hail damage roof inspection and get a written scope with measured coverage before you commit to anything.
Sources
- Wisconsin Administrative Code SPS 321.28(4) — Ice dam protection
- Ice and Water Shield: Where It Goes and How It Works
- Ice and Water Shield: Where to Use It + Install Guide
- High-temperature ice and water shield guidance for metal roofing
FAQ
What Are the Requirements for Ice and Water Shield in Wisconsin?
SPS 321.28 requires membrane meeting ASTM D1970 to extend at least 30 inches up the roof slope from the edge and at least 12 inches past the interior wall face on qualifying shingle and shake roofs over heated space.
Should I Cover My Whole Roof With Ice and Water Shield?
Full-deck coverage is sometimes used in heavy-snow microclimates, but it changes moisture management and needs to be coordinated with attic ventilation to avoid trapping moisture under the membrane.
Where on the Roof Should Ice and Water Shield Be Installed?
At minimum, it belongs at every eave, continuously through valleys, and wrapped around every roof penetration like chimneys and vents, with low-slope transitions treated the same way in high-risk cases.
Are Roofers Responsible for Ice Damming?
A roofer is responsible for correctly installing code-compliant membrane and integrating it with flashing, but ice dams often originate from attic heat loss, so a lasting fix usually requires insulation and ventilation work alongside the roofing itself. Am-exteriors coordinates both when a project calls for it.