
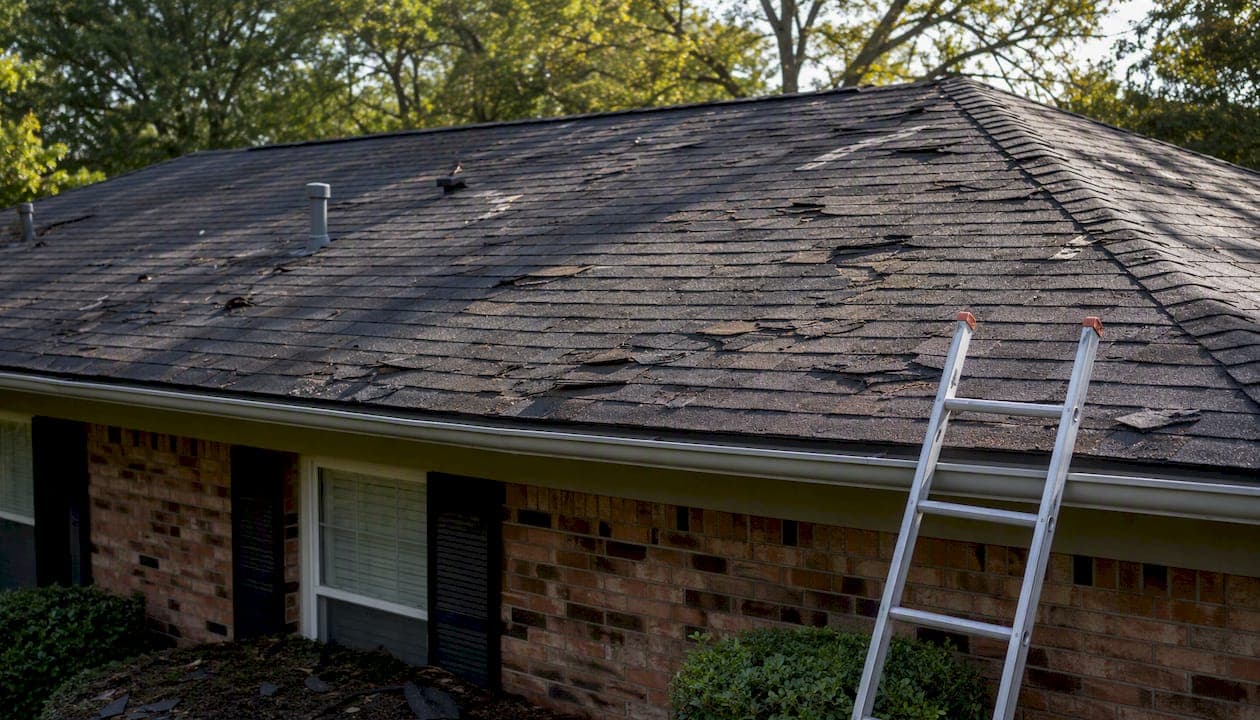
If you suspect wind damage to your roof, take three steps in the first 24–72 hours: document everything from the ground, apply temporary protection if it's safe to do so, and contact your insurer and a licensed roofer.
- Photograph from the ground. Walk all four sides of the house. Capture the full roofline, gutters, soffits, and any debris on the ground. Date-stamp every photo.
- Check your attic. Look for daylight, wet insulation, or water tracking along the framing. These signs confirm a breach even when the exterior looks minor.
- Apply a tarp only if it's safe. Do not climb a wet or structurally compromised roof. If the opening is large or the surface is unstable, wait for a professional.
- Notify your insurer and a licensed roofer. Open the claim promptly. Delays can complicate coverage and allow water intrusion to worsen.
Quick documentation protects your insurance claim and stops secondary damage like mold and deck rot from developing before a contractor arrives.
Pro Tip: Set your phone camera to embed GPS and timestamp data before you start shooting. Adjusters look for contemporaneous evidence that ties the damage to the storm event, not a repair visit days later.
Key Takeaways
Wind damage to your roof requires documentation within 24–72 hours, temporary protection if safe, and a licensed professional inspection to protect both your home and your insurance claim.
| Point | Details |
|---|---|
| Document before anything else | Photograph all four sides, gutters, attic, and debris within 24 hours of the storm. |
| Temporary protection method | Use furring strips and tarp screws rather than stapling directly to roofing materials. |
| Wind speed action threshold | Schedule a professional inspection after sustained or gusting winds near 50–58 mph. |
| Installation quality matters | IBHS research shows fastener placement and sealant practice materially increase wind uplift resistance. |
| Am-exteriors next step | Free inspections, emergency tarping, and insurance claim support available in Southeast Wisconsin. |
Table of Contents
- How to recognize visible and interior signs of wind damage
- How to inspect your roof safely after a storm
- Immediate actions after you find damage
- Will homeowners insurance cover wind damage and how to file a claim
- When it's time to hire a roofer and what to ask
- Repair choices, costs, and what drives the timeline
- Why installation quality and material choice affect wind resistance
- Local building codes and wind damage repair requirements
- What roofing warranties actually cover for wind damage
- Safety precautions and gear when inspecting a damaged roof
- How to document wind damage for an insurance claim
- What we see after storms in Southeast Wisconsin
- Am-exteriors handles inspections, tarping, and claims in Southeast Wisconsin
- Sources
How to recognize visible and interior signs of wind damage
Visible wind damage follows predictable patterns. Missing shingles, lifted or curled tabs, horizontal creases across the shingle face, torn edges, and granule accumulation in gutters are the most common exterior indicators. Displaced ridge caps, dented metal flashings, and damaged soffit or fascia panels often accompany shingle damage and are easy to spot from the ground.
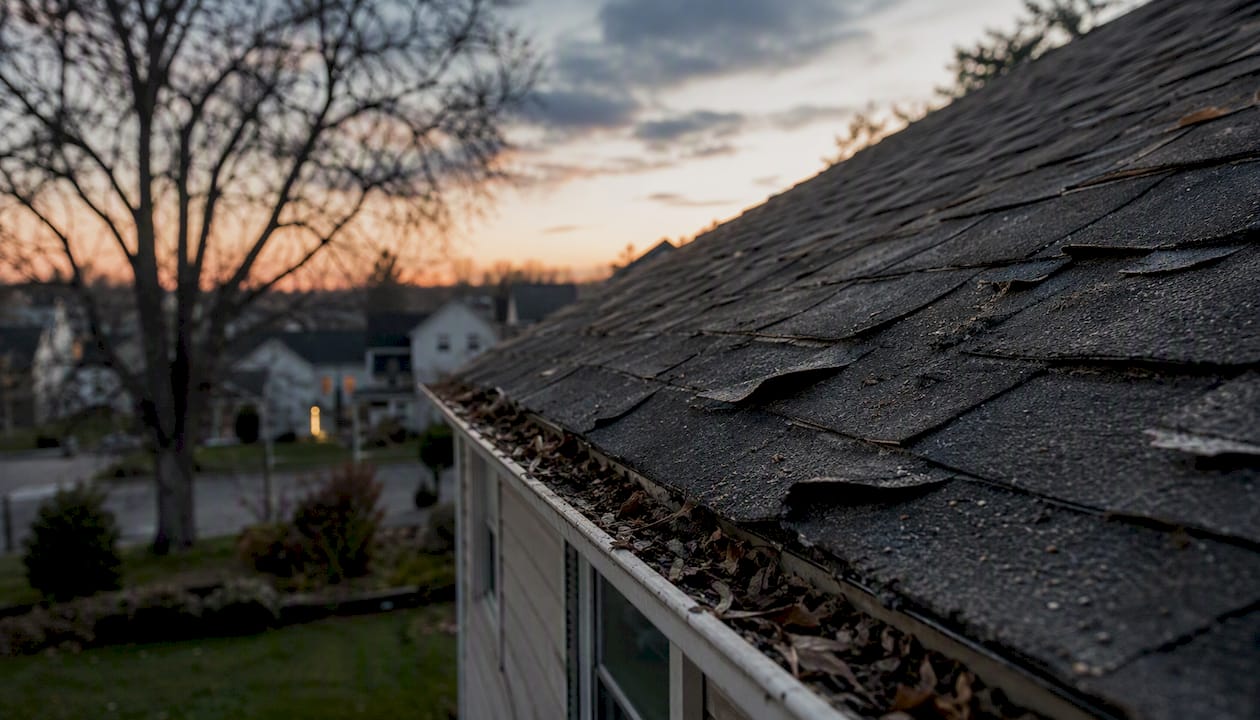
Wind lifted shingles leave a specific physical record. According to Shingle Digest, wind-affected shingles show permanent creases, folds, tears, or missing sections. Granule loss alone usually reflects normal aging. When granule loss appears alongside lifted or creased shingles, it supports a wind-damage finding rather than routine wear.
Distinguishing wind damage from ordinary wear:
- Pattern and direction. Wind damage concentrates on windward slopes, eaves, hips, and ridges. Uniform degradation across the whole roof points to age or a manufacturing issue.
- Crease location. A horizontal crease near the shingle's midpoint is a classic sign of a tab that lifted and folded back under wind pressure.
- Granule loss vs. hail damage. Hail leaves circular impact marks and bruising in the mat. Wind damage does not. Granule loss without impact marks is wear; granule loss with lifted tabs is wind.
- Flashing displacement. Wind can pull step flashing away from walls and chimney bases, creating gaps that are invisible from the ground but allow water in immediately.
Interior signs often appear days or weeks after the storm. Ceiling stains, wet or compressed insulation, musty odors, and water tracking along attic framing all suggest an existing breach. A slow-developing leak from a lifted edge or broken seal can show up as a ceiling stain weeks after the event, by which point mold may already be forming.
Photo checklist for documentation:
- Full-roof shots from all four sides of the house
- Close-ups of any crease, lifted tab, or torn edge
- Gutters and downspout outlets (granule accumulation)
- Ground-level debris (shingle fragments, ridge cap pieces)
- Attic framing, insulation, and any visible moisture
How to inspect your roof safely after a storm
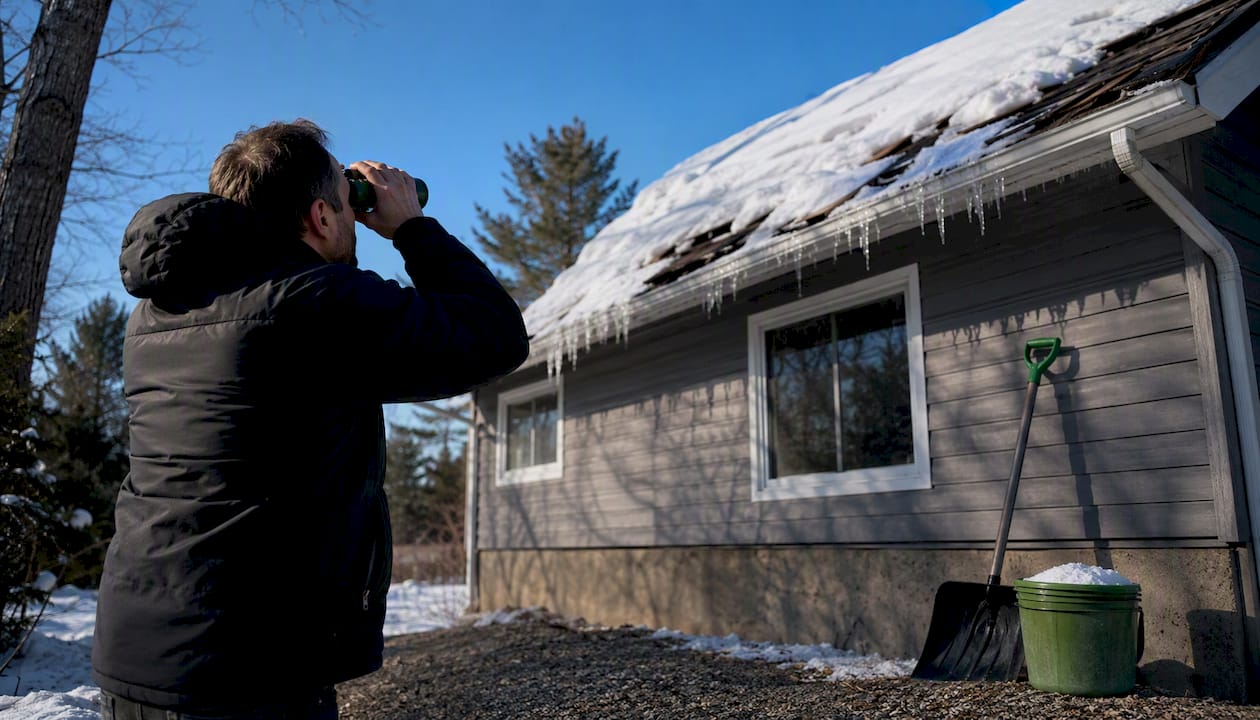
Start from the ground. Walk the perimeter with binoculars and check the roofline, gutters, soffits, and visible flashings. Use a safe vantage point such as an upstairs window or a neighbor's elevated yard rather than a ladder whenever possible. Look for lifted tabs, missing sections, and displaced ridge caps.
Next, go into the attic. Bring a flashlight and look for daylight coming through the deck, wet or discolored insulation, damp framing, and any musty smell. Daylight through the deck means the underlayment and shingles are both compromised. Wet insulation without visible daylight suggests a small breach that water is tracking along a rafter before dripping.
When not to climb:
- The roof surface is wet or icy
- You cannot set a ladder on stable, level ground
- Wind is still gusting
- You see sagging, soft spots, or structural compromise from the ground
- You have no second person present to stabilize the ladder
Industry guidance recommends scheduling a professional inspection after storms with sustained or gusting winds near 50–58 mph, or whenever visible collateral damage appears on soffits, gutters, or siding.
Pro Tip: Shoot a slow video walkthrough of the full perimeter rather than relying only on still photos. Video captures the overall damage pattern, which helps adjusters and contractors assess scope before they arrive. Narrate the date, time, and wind conditions as you record.
Immediate actions after you find damage
Act in this order to limit secondary damage and preserve your claim.
- Document first. Photograph all four sides of the roof, close-ups of every damaged area, gutters, downspouts, and attic evidence. Keep any shingle fragments or debris in a bag or box. Do not discard them.
- Log the timeline. Write down the date and time of the storm, when you discovered the damage, and every action you take afterward. Adjusters look for a clear chronology.
- Apply temporary protection. If the opening is accessible and it's safe to work, cover it with a tarp. The best method: secure furring strips along the roof edge and attach tarp screws through the tarp into the furring strip rather than stapling directly into roofing materials, which can cause additional damage in subsequent winds. Heavy plastic sheeting weighted at the edges is an alternative for small openings on low-slope sections.
- Avoid permanent repairs until the adjuster documents the loss. Emergency tarping is fine and expected. Replacing shingles before the adjuster visits can complicate your claim. If safety requires immediate action, photograph everything before and after, and keep all receipts.
- Contact your insurer. Open the claim as soon as possible. Per Iii, provide dated photos, a written description of the event, and receipts for any emergency repairs.
- Schedule a licensed roofer. A professional can confirm scope, provide a written estimate, and assist with adjuster meetings.
Acting within 24–72 hours matters. Water that enters through a lifted edge or cracked flashing can saturate the deck and insulation quickly, and mold can begin forming within 24–48 hours in warm, humid conditions.
Evidence preservation checklist:
- Bagged shingle fragments and debris
- Date-stamped photos and video
- Written storm timeline (date, time, weather)
- Receipts for all emergency materials and labor
- Insurer claim number and adjuster contact
Will homeowners insurance cover wind damage and how to file a claim
Standard HO-3 homeowners policies treat wind as a covered peril for sudden events. They do not cover gradual wear, deferred maintenance, or pre-existing damage. The practical distinction matters: a shingle that lifts and tears in a 60 mph gust is covered; a shingle that was already curling from age and finally detached in a mild breeze may not be.
Key policy and claim concepts:
- ACV vs. RCV. Actual Cash Value (ACV) pays the depreciated value of the roof at the time of loss. Replacement Cost Value (RCV) pays what it costs to replace it with like materials. A 15-year-old roof on an ACV policy may yield a payout that covers only a fraction of replacement cost.
- Wind/hail deductibles. Many policies in storm-prone states carry a separate wind or hail deductible, often expressed as a percentage of the dwelling coverage (1–5%) rather than a flat dollar amount. Read your declarations page before assuming a standard $1,000 deductible applies.
- Matching. Some states require insurers to replace entire roof sections for color and texture match. Others do not. Wisconsin homeowners should review their policy language and ask their adjuster directly.
- Roof age and depreciation. A roof past its expected service life may receive reduced payment or denial on wear-and-tear grounds even after a wind event. Document the roof's installation date and any prior maintenance.
The Insurance Information Institute recommends opening the claim promptly, providing dated photos and receipts, and avoiding permanent repairs until the insurer documents the loss. Keep a copy of every document you submit.
Claim timing matters. Adjusters look for contemporaneous photos and a timeline that connects the storm to the damage. A photo taken the day after the storm carries more weight than one taken two weeks later.
For a step-by-step walkthrough of the Wisconsin claim process, the storm damage insurance claim guide from Am-exteriors covers local insurer expectations and documentation tips.
When it's time to hire a roofer and what to ask
Schedule a professional inspection within 24–48 hours if you see any of these:
- Sustained winds above 58 mph during the storm with visible shingle loss
- Active attic leaks or ceiling stains appearing after the storm
- Large missing sections or openings you cannot safely tarp
- Displaced ridge caps, torn flashing, or damaged soffits across multiple areas
For less obvious damage, schedule an inspection within a few days. Wind damage is often cumulative. A lifted edge that looks minor can allow water intrusion that only shows up as a ceiling stain weeks later.
Contractor vetting checklist:
- Verify a current Wisconsin contractor's license and general liability insurance
- Ask for a certificate of insurance naming you as an additional insured
- Request at least two local references from jobs completed in the past 12 months
- Ask whether the installer is manufacturer-certified (for wind warranty eligibility)
- Get a written scope of work and itemized estimate before signing anything
- Confirm the company has a local, verifiable address
Red flags to avoid:
- Contractors who knock on your door immediately after a storm and pressure you to sign the same day
- Requests for large cash-only deposits upfront
- No local address, no verifiable references, or a license that doesn't check out on the Wisconsin DSPS lookup
- Verbal-only estimates with no written scope
A professional inspection should include a roof plan diagram showing damage locations, a moisture meter reading of the deck, an attic check, and a written estimate with both repair and replacement options. For local storm damage repair in Southeast Wisconsin, Am-exteriors provides written estimates and adjuster-ready documentation.
Repair choices, costs, and what drives the timeline
The right repair depends on how much of the roof is affected, the age of the deck and underlayment, and whether the existing shingles can be matched.
Common repair options:
- Spot shingle replacement. Works when damage is limited to a few shingles and the deck is sound. The main challenge is color match: shingles fade over time, and new replacements often stand out on an older roof.
- Course repair. Replacing a full row or section of shingles, often used when a wind event strips an entire eave course or ridge line.
- Flashing replacement. Step flashing, chimney flashing, and pipe boots are common wind-damage casualties. Replacing them is relatively low-cost but critical, since a failed flashing is often the actual water entry point.
- Deck replacement. When water has been entering for an extended period, the OSB or plywood deck may be soft or delaminated. Deck replacement adds cost and time but is necessary before new shingles go down.
- Full reroof. When a roof is past its service life, has widespread damage, or the underlayment is compromised, a full replacement is often the more cost-effective long-term choice.
Roof age, decking condition, underlayment state, and shingle type all influence whether a spot repair makes sense or a full replacement is the prudent call. Manufacturer wind ratings commonly range from 60 to 130 mph depending on the product, but actual damage can occur at lower speeds on older or improperly installed roofs. Insurance typically covers a full reroof when the adjuster documents that the damage is widespread and the roof cannot be reasonably repaired to match.
Cost context. Roofing costs vary by material, scope, and region. Get at least two written estimates before committing. For a repair-vs-replacement framework specific to Wisconsin, the Am-exteriors repair or replace guide walks through the decision criteria in detail.
Permit timelines, material lead times, and weather windows all affect scheduling. A spot repair can often happen within days. A full reroof typically takes one to two weeks from contract to completion in normal conditions, longer during peak storm season.
Why installation quality and material choice affect wind resistance
IBHS research is direct on this point: correct fastener placement and proper sealant practice materially increase wind uplift resistance, and poor installation is frequently the reason roofs fail under moderate wind. A roof installed with nails placed too high on the shingle (above the nailing zone) loses most of its uplift resistance even if the shingles themselves carry a high wind rating.
Specific installation details that change outcomes:
- Nail pattern. Four nails per shingle is standard; six nails in high-wind zones significantly increases resistance. Nails placed above the nailing strip reduce holding power.
- Sealant strip activation. The factory sealant strip bonds tabs to the course below when exposed to heat. In cold-weather installations, the strip may not activate before a wind event, leaving tabs unsealed.
- Starter strip. A proper starter strip with sealant at the eave prevents the first course from lifting. Skipping it is one of the most common installation shortcuts that leads to eave damage.
- Flashing attachment. Flashings secured with roofing cement alone rather than mechanical fasteners are more likely to displace in high winds.
FEMA and FLASH mitigation guidance emphasizes extra anchorage at eaves, rakes, hips, and ridges, which are the zones homeowners should inspect first after any storm.
Wind speed reference and homeowner action thresholds:
| Wind Speed Range | Likely Damage Mode | Homeowner Action |
|---|---|---|
| — | Minimal risk on sound roofs | No action needed |
| 50–58 mph | Lifted tabs on older or poorly sealed roofs | Ground check; inspect attic |
| 58 mph and above | Missing shingles, displaced ridge caps, flashing damage | Professional inspection within 24–48 hours |
| — | Widespread shingle loss, structural risk | Immediate tarp if safe; file claim; call a roofer |
Pro Tip: Ask your roofer specifically: "What nail pattern will you use, and will you hand-seal the tabs in cold weather?" A contractor who can answer those questions without hesitation is one who understands what actually prevents callbacks.
Local building codes and wind damage repair requirements
Roofing repairs in Wisconsin require a permit in most municipalities when the work involves structural changes or a full replacement. Permit requirements vary by county and city, so confirm with your local building department before work begins. Dodge County and surrounding Southeast Wisconsin municipalities generally follow the Wisconsin Uniform Dwelling Code (UDC), which sets minimum standards for roofing materials, underlayment, and fastening.
A few practical points for homeowners:
- Permit pulls. A licensed contractor should pull the permit, not the homeowner. If a contractor asks you to pull your own permit, that's a red flag.
- Inspection requirements. Some jurisdictions require a mid-job inspection of the deck and underlayment before shingles go down. Ask your contractor whether this applies to your project.
- Code upgrades. When replacing a roof after storm damage, local code may require upgrades to current standards, such as ice-and-water shield at eaves. Insurance policies vary on whether they cover code-required upgrades; ask your adjuster about "ordinance or law" coverage.
- HOA rules. If your property is in a homeowners association, check whether shingle color or material changes require HOA approval before signing a contract.
What roofing warranties actually cover for wind damage
Roofing warranties come in two types, and they cover different things. Understanding the difference prevents surprises after a claim.
Manufacturer's material warranty covers defects in the shingles themselves. Most architectural shingles carry a limited lifetime warranty on the material, with wind coverage typically listed separately. Wind coverage under manufacturer warranties commonly ranges from 60 mph to 130 mph depending on the product tier. However, that wind coverage usually requires:
- Installation by a manufacturer-certified contractor
- The specified number of fasteners per shingle
- Use of the manufacturer's own starter strip and underlayment products
If any of those conditions aren't met, the wind portion of the warranty may be void. Malarkey shingles, which Am-exteriors installs, carry strong wind ratings and are backed by manufacturer warranty support when installed to spec.
Workmanship warranty covers installation errors. This comes from the contractor, not the manufacturer, and terms vary widely. A reputable local contractor should offer at least a two-year workmanship warranty; many offer five or more.
What warranties typically do not cover:
- Damage caused by wind speeds above the listed rating
- Damage resulting from improper installation by a non-certified contractor
- Pre-existing wear or maintenance neglect
- Acts of God above a specified threshold (check the fine print)
When filing an insurance claim, the warranty does not replace coverage. They operate independently. Your insurer covers the sudden loss event; the warranty covers defects or installation failures.
Safety precautions and gear when inspecting a damaged roof
Personal safety comes before any inspection task. Falls from roofs are among the leading causes of home-related injuries, and a storm-damaged roof adds unstable surfaces and hidden weak spots to that risk.
For ground-level and attic inspections:
- Wear closed-toe, non-slip shoes
- Use binoculars rated at 8x or higher for a clear ground-level view
- Bring a flashlight and a moisture meter if you have one for the attic check
- Have a second person present whenever you use a ladder
If a professional or experienced person does access the roof:
- Use a harness and anchor system rated for roofing work
- Wear rubber-soled roofing boots
- Avoid the roof entirely if wind is still gusting above 20 mph
- Stay off any area that feels soft or spongy underfoot; that indicates deck damage below
Never access a roof alone. Never work on a wet surface. If the damage is severe enough that you're considering climbing to assess it, it's severe enough to call a professional instead.
How to document wind damage for an insurance claim
Thorough documentation is the single biggest factor in a smooth claim. Adjusters rely on what you provide, especially when they arrive days after the storm.
Documentation checklist:
- Whole-roof photos from all four sides taken from the ground or a safe elevated position
- Close-up shots of each damaged area: lifted tabs, creases, missing shingles, torn edges
- Gutter and downspout photos showing granule accumulation
- Ground-level debris shots with a ruler or common object for scale
- Attic photos showing any moisture, staining, or daylight
- Interior ceiling stains with the room identified in the caption or narration
- Video walkthrough narrating date, time, and storm conditions
- Weather record screenshot from Weather.gov or a local station for the storm date
Photo tips for better results:
- Shoot in the morning or late afternoon when low-angle light shows surface texture and creases more clearly
- Use a zoom lens or your phone's 2x optical zoom rather than digital zoom for close-ups
- Include a reference object (a coin, a tape measure) next to damage for scale
- Avoid shooting directly into the sun; position yourself so the damage is front-lit
Keep all photos in a dedicated folder with the storm date in the folder name. Back them up to cloud storage before submitting to your insurer. Per III.org, adjusters give more weight to contemporaneous documentation tied to the storm event than to photos taken after cleanup has begun.
What we see after storms in Southeast Wisconsin
Wind damage in Southeast Wisconsin tends to follow a consistent pattern. Edge damage and starter-course failures are the most common findings after spring and summer storms. Flashings around chimneys and pipe boots are the next most frequent failure point, often because they were sealed with roofing cement alone rather than properly mechanically fastened. Ridge caps are another regular casualty, particularly on roofs where the cap shingles were nailed with too few fasteners.
The homeowner mistakes that increase costs most often are waiting too long to call, attempting DIY tarping that causes additional damage, and discarding shingle debris before the adjuster visits. Each of those can complicate or reduce a claim.
Am-exteriors documents damage with photos, moisture readings, and a written roof plan before any work begins. That documentation goes directly to your adjuster, which reduces back-and-forth and speeds up the claim process. Am-exteriors also handles insurance claim assistance directly, so homeowners don't have to navigate the adjuster process alone.
Am-exteriors handles inspections, tarping, and claims in Southeast Wisconsin
Storm damage moves fast. Am-exteriors offers free roof inspections for Southeast Wisconsin homeowners after wind and hail events, with same-week scheduling in most cases. The inspection includes a full roof assessment, moisture readings, a written damage report, and adjuster-ready photo documentation.

For active leaks or large openings, emergency roof repair and tarping is available to stop water intrusion before permanent repairs begin. Am-exteriors is a licensed, insured, and manufacturer-certified installer, which means the wind warranty on your new roof is valid from day one. The team also handles the insurance claim process end to end, from the initial inspection through adjuster meetings and final sign-off.
For full replacement or repair options, visit the roofing services page to review materials, warranties, and scheduling. To book a free inspection, contact Am-exteriors directly through the website.
Sources
The inspection, insurance, and installation guidance in this article draws from the following primary sources. Each is worth reading directly if you want the full technical or policy detail behind a specific point.
- Understanding Roof Storm Damage: Causes, Signs, How to Inspect and Next Steps
- Wind Uplift of Asphalt Shingles (IBHS)
- How to file a homeowners claim
- Evaluating Wind Damage to Asphalt Shingles
This article is general information, not a substitute for advice from a qualified financial advisor. Consult a qualified financial professional about your own circumstances before acting on anything here.